<< return to Pixycam.com

Guidance on troubleshooting intersection / setNextTurn

I’m wondering if I use the intersection/junction/setNextTurn thingy correctly and I would like some guidance to help me either troubleshoot the issue or observe that pixy2 simply cant work for my project.

I am making a big line O (a simple 15m closed loop).

I use a simple two wheel drive system with the pixy2 between the two wheel at about 8~10cm from the ground tilted at about 60 degrees (ok. i would need to make precise measurements). The line pattern taped on the floor is 50mm of white, then 25mm of black, then again 50mm of white.
I then make timelapse video of the system and watch the vehicle go in circle for 8h straight.
=> it works all right.

Now i’m trying to introduce the concept of a junction
(in green the barcode on the floor)
Sans%20titre

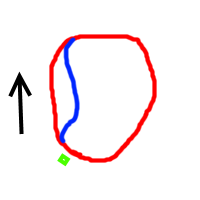
The idea is to reproduce the system on pixy2 main website: use a barcode, then increment a counter, if the counter is even go left, otherwise go right. (+turn on/off two leds to show where it will go next)
I basically use
setNextTurn(-45) or setNextTurn(+45)
(i also tried +90/-90)

`source: https://docs.pixycam.com/wiki/doku.php?id=wiki:v2:line_api
setNextTurn(int16_t angle)
This function tells the line tracking algorithm which path it should take at the next intersection.
Turn angles are specified in degrees, with 0 being straight ahead, left being 90 and right being -90 (for example), although any valid angle value can be used. Valid angles are between -180 and 180.

setNextTurn() will remember the turn angle you give it, and execute it at the next intersection. The line tracking algorithm will then go back to the default turn angle for subsequent intersections.`

At the moment, given hardware constraints, when the pix2 is mounted, I can no longer access its USB port to see what the camera sees (I have ordered an L-shaped microUSB cable but it’s not delivered yet). I am blind while this cable has not been delivered.

I do see that the barcode reading works since the LED do change color at each even/uneven lap when it is seen by pixy.
However, sometimes it turns on the correct direction, sometimes not. I cannot identify a pattern.

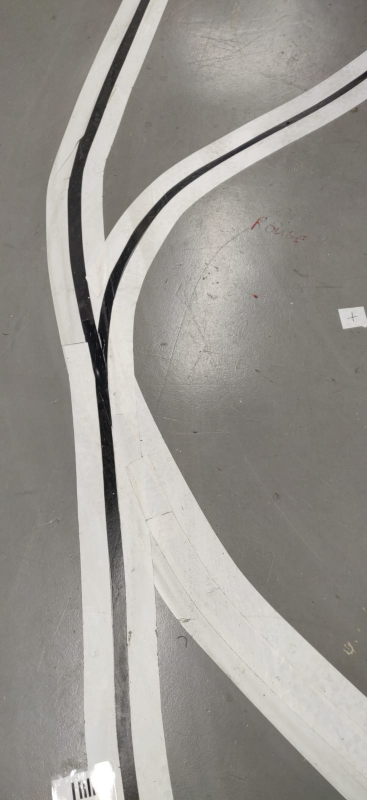
Is the line pattern ok? should I have more “hard” junctions?(here they nearly start as two tangents.
Except waiting for that new cable to reach my place, what do you suggest to troubleshoot the situation?

Hello,
I’m wondering if Pixy2 is having trouble reliably detecting the lines given that it is a black line on a white background on gray background. Have you verified that it detects the lines accurately by bringing up Pixymon and making sure the Vector is reliably detected?

If not, you might try adjusting the “edge threshold” parameter to improve the line detection accuracy. Performing this adjustment while looking at an intersection would be best.

https://docs.pixycam.com/wiki/doku.php?id=wiki:v2:pixymon_index#line-tracking-tuning-tab

Also, the intersection detection accuracy can usually be improved by increasing the “intersection filtering” parameter. Try 3 or 4.

https://docs.pixycam.com/wiki/doku.php?id=wiki:v2:pixymon_index#line-tracking-expert-tab

If you set the intersection filtering parameter too high, intersection detection will be slowed down too much and a faster robot will miss the intersection entirely.

Hope this helps!

Edward

Yes the line following algorithm // once the min/max line width params have been tuned // works great on this floor and lightning conditions. By Using the pixy2 embedded flashlights, i got to to work even in pitch black dark. I have likely over 100h of successfull runs. This part is just great btw. (But without the white lines it fails miserably)

I think I’ll just 3d print a mini cart on bearings to just hold the pixy2 at the same location/orientation while manually moving around, connected to pixymon.
That should also help me with the tuning hopefully

Thanks for hinting towards the expert tab. Is there a reset to factory defaults somewhere? I find the description/guidance about parameter settings a bit short. It would be useful to offer a YouTube video to explain visually the effect of those parameters.

Also, the vehicle goes at about 1m/s and the microcontroller uses all the ~61fps that pixy2 can provide. In other words, I have a frame analyzed every ~16mm (don’t know if I should mention that)

Hello,
You can reset to defaults through Pixymon:

https://docs.pixycam.com/wiki/doku.php?id=wiki:v2:pixymon_index#restoring-default-parameters

1 meter per second is really fast! If there is any video of your robot, please send us a link. :slight_smile:

Edward

thanks. it may go slower than 1m/s. I do not really know in fact since because i’m still in the development phase. i target a walking speed. by the way: should I reduce speed when approaching a junction ? (right after reading the barcode)

I reproduce the track on my desk: using tape and paper + a mini-pixy2-holder that i can manually move around. Since line following works just fine, i did not touch the “edge threshold” param. I just touched “intersection filtering” (used 5) while manually trying to “follow” the red vector.

While approaching an intersection, I observe many colored lines in pixymon live feed (yellow, cyan, dark blue) that will appear/disappear. ==> video to observe the behavior
What is the meaning of those colors?
Is there some way to output in pixymon what goes to serial output?
I also noticed that the junction is “seen”, then lost, then “seen” again, from one frame to the next. I really struggle to correctly configure it. => Is this normal ?

what parameter of the line follower algo have an influence on the minimum/maximum size of a barcode?

Have you considered using narrower lines, or perhaps moving Pixy2 farther away from the lines? The way you have it set up, the line width takes up a significant portion of the the image. You can likely tune things to get it working, but it’s not the best configuration. (As Pixy2 gets closer to the lines, and/or the lines get thicker, less information is able to fit in the image. Seeing more of the line in front it means the robot can predict where the line is going better and thus go faster, for example.)

At any rate, you should be concerned with 4 key parameters: Maximum line width, Minimum line width, which are in the tuning tab and the Maximum merge distance and Minimum line length which are in the expert tab.

Maximum and minimum line width may need to increase to get good accuracy of detecting your lines. You can make the minimum really small and the maximum really large and you’ll essentially be able to detect lines of any width, but that offers no “filtering”. Bounding the width of your line can help. You can tune these by having your robot look at the line in front of it and make sure that the minimum parameter can accomodate the line at the top of the image, which is at it’s narrowest – and the maximum parameter can accomodate the line at the bottom of the image, which is at it’s thickest. You’ll also want to put in some extra flexibility for lines that are off-angle, because these will appear thicker than normal for Pixy2. Intersections can also result in lines that are “thicker”, so the maximum line width is the more critical of the two parameters – make sure not to make it too small. Making the maximum line width 50% larger than you absolutely need it is a good rule of thumb.

You are seeing extra lines in PixyMon at intersections because your lines are so thick and Pixy2 is having trouble finding the actual intersection because the intersection takes up so much of the image. You can help remedy this by using narrower lines, or move Pixy2 farther away (as mentioned), but if you’d rather “tune” things, increasing the Maximum merge distance will help the most. Tune this by having Pixy2 look at an intersection and increase the maximum merge distance until the extra lines go away. If you make maximum merge distance too large, Pixy2 might merge lines that it shouldn’t merge, like parallel lines/tracks, but it looks like there is less concern in your case. That is, it looks like it is unlikely that your robot will see two lines/tracks in the same image because of the size of your lines and the spacing.

Once you get the maximum merge distance tuned (few or no extra lines seen in PixyMon), increase the minimum line length by the same percentage. For example, if you doubled the maximum merge distance, double the minimum line length.

Note, none of these parameters affect the barcode detection. There are no parameters that affect the size of these.

Hope this helps :slight_smile:

Edward ,

Mmmm… it kinda stuck if I have to reduce the line width. Why using 25mm black, then two sides of 75mm of white)? because

  • Where I intend to use the robot, there is significant activity. I put some of the tape there to let it rest of 3~4months now and I already observed that: the white becomes grey/yellowish-ish due to dirt/dust and the black gets grey (therefore the constrast between the two reduces) => having a significant portion of white really helped
  • because of that activity, the line (either the white portion or the black portion) get damaged. When that happens, durts gets into it. As the floor is being cleaned up, dust accumulates and potentially creates something that could be interpreted as a line by pixy2. Having a 25mm black line width (and not 5 or 10mm), felt like it would reduce the risk of “false positive” in line detection.

Now I have already ordered 200~300m of that line, so I would rather stick with it if possible.

Having the pixy2 mounted further away is kinda tricky: the robot chassis will end up in the video feed and will obstruct the line. Same goes if I tilt the cam angle so that it sees “further”. But i will try anyway.

thanks for your advice. i’ll try that and report here